前言 (feihua)
前两天研究了一下homekit可以模拟一个开关实现siri语音控制,但是模拟的毕竟是模拟的,我要把它变成现实。
先拿主灯下手。晒一下装备,这是个红外线解码仪,很久之前淘宝买着玩的,要控制对着按就能显示数据码。支持多种制式可以选择。
除了空调遥控,目前还没遇到解不出来的。(空调遥控由于编码很长,这个也没法解)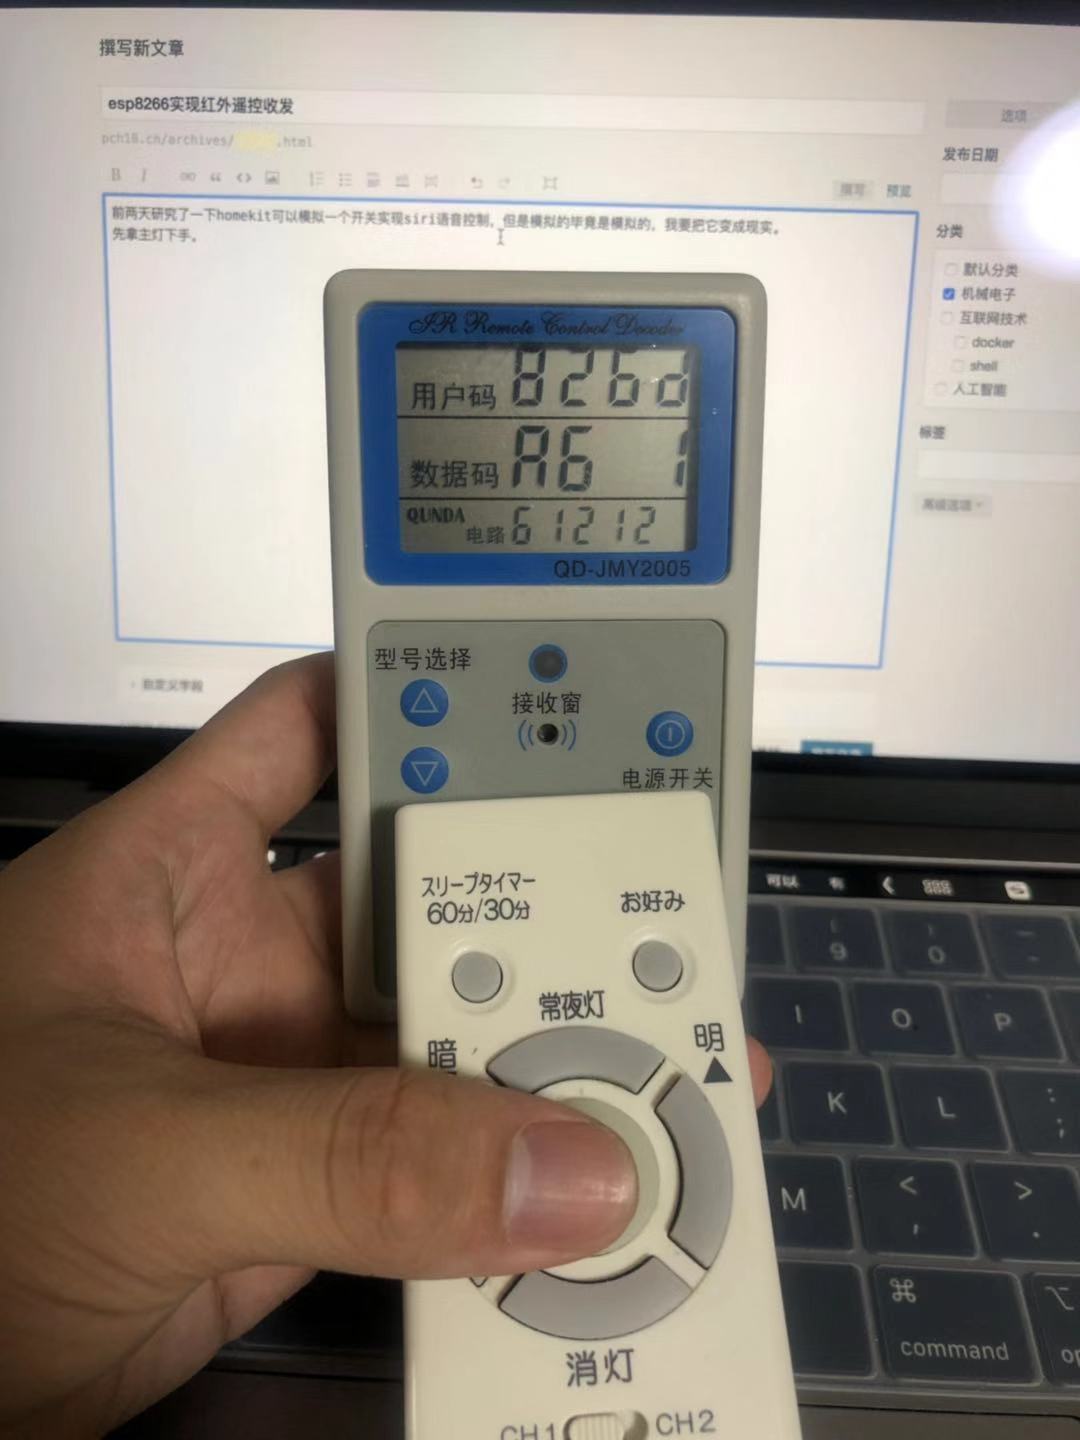
接下来普及一下红外调制方式,一般红外线是38khz载波发送代表1,不发数据代表0.网上找了个图,应该很形象表示调制解调的过程。
接下来就进入主题了,如何用esp8266发送和接受红外编码。
首先我们先去官网下载arduino IDE https://www.arduino.cc/en/Main/Software?setlang=cn#
我这是macos 所以下载的macos版本
当然esp8266也有官方固件烧写工具,但是arduino里面现成的库很全面,所以这里选用他
下载好我们还不能烧写固件,因为这个是给arduino用的,我们要添加esp8266开发板,
如图在首选项 -> 附加开发板管理器网址里面填入http://arduino.esp8266.com/stable/package_esp8266com_index.json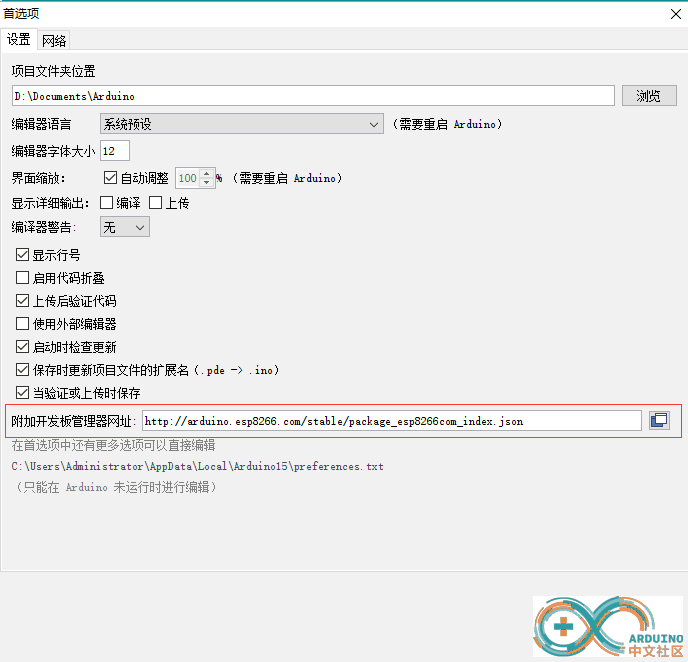
接着在工具-> 开发板 -> 点击开发板管理器->滚到最下面找到esp8266 by ESP8266 Community安装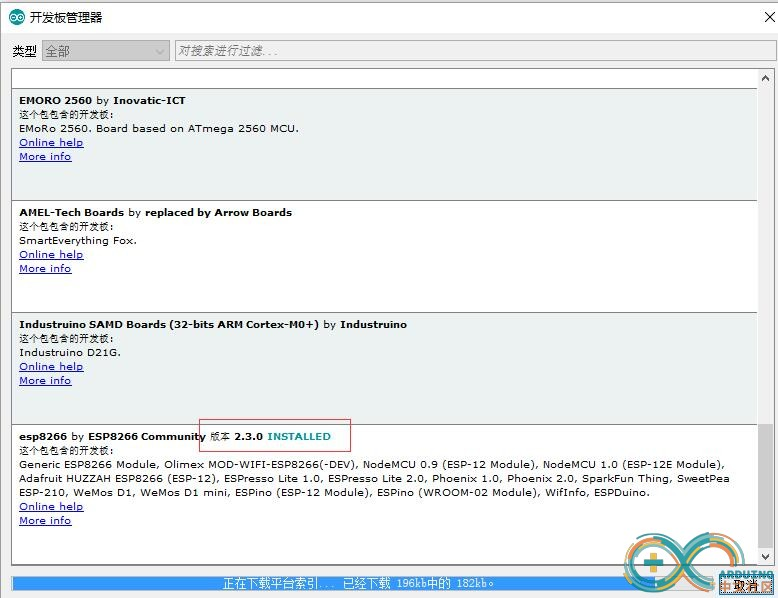
到这里,工具-> 开发板里面应该会有esp8266选项,选择我们的型号就可以开始esp8266编程了。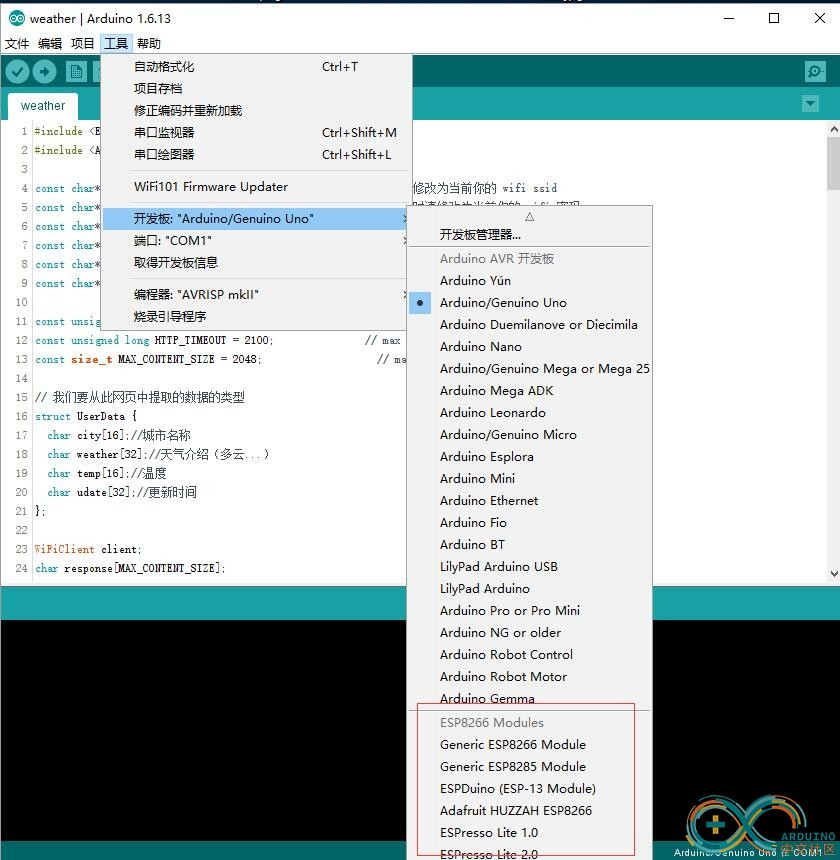
硬件部分
首先焊接模块,需要注意的是,esp8266是3.3v供电。我这里选用ams1117把5v变成3.3v,按照最小系统把电路组装起来。
吐槽一下,esp8266脚间距比正常的小,我这里用了个转接板。上万能板。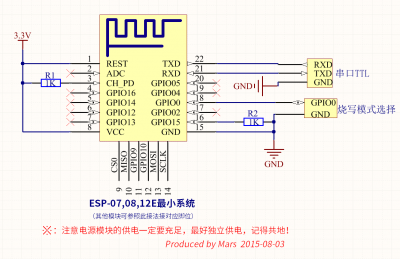
我们这里用了两个1.4v的红外LED串联,接在GPIO14口,红外接收器接在GPIO15口
板载的蓝色LED在GPIO2口,可以直接展示信息,但是不要作为输入口用,可能会有干扰。
需要注意的是GPIO9,GPIO10口,不要碰,那两个是连寄存器的,碰了程序会崩。
也不是完全不能用,好像flash mode调到非QIO就不会占用那两个口,具体没研究。GPIO6~GPIO11不要使用,否则引起存储错误,不停重启;GPIO0、GPIO2、GPIO15也都不要使用。
对于ESP-12模块,板载灯在GPIO2,也是低电(LOW)平点亮。GPIO16只能做为输出,不能输入,否则也会引起错误
最后成品是这样。拨动开关是写入程序用的,微动开关是复位用的。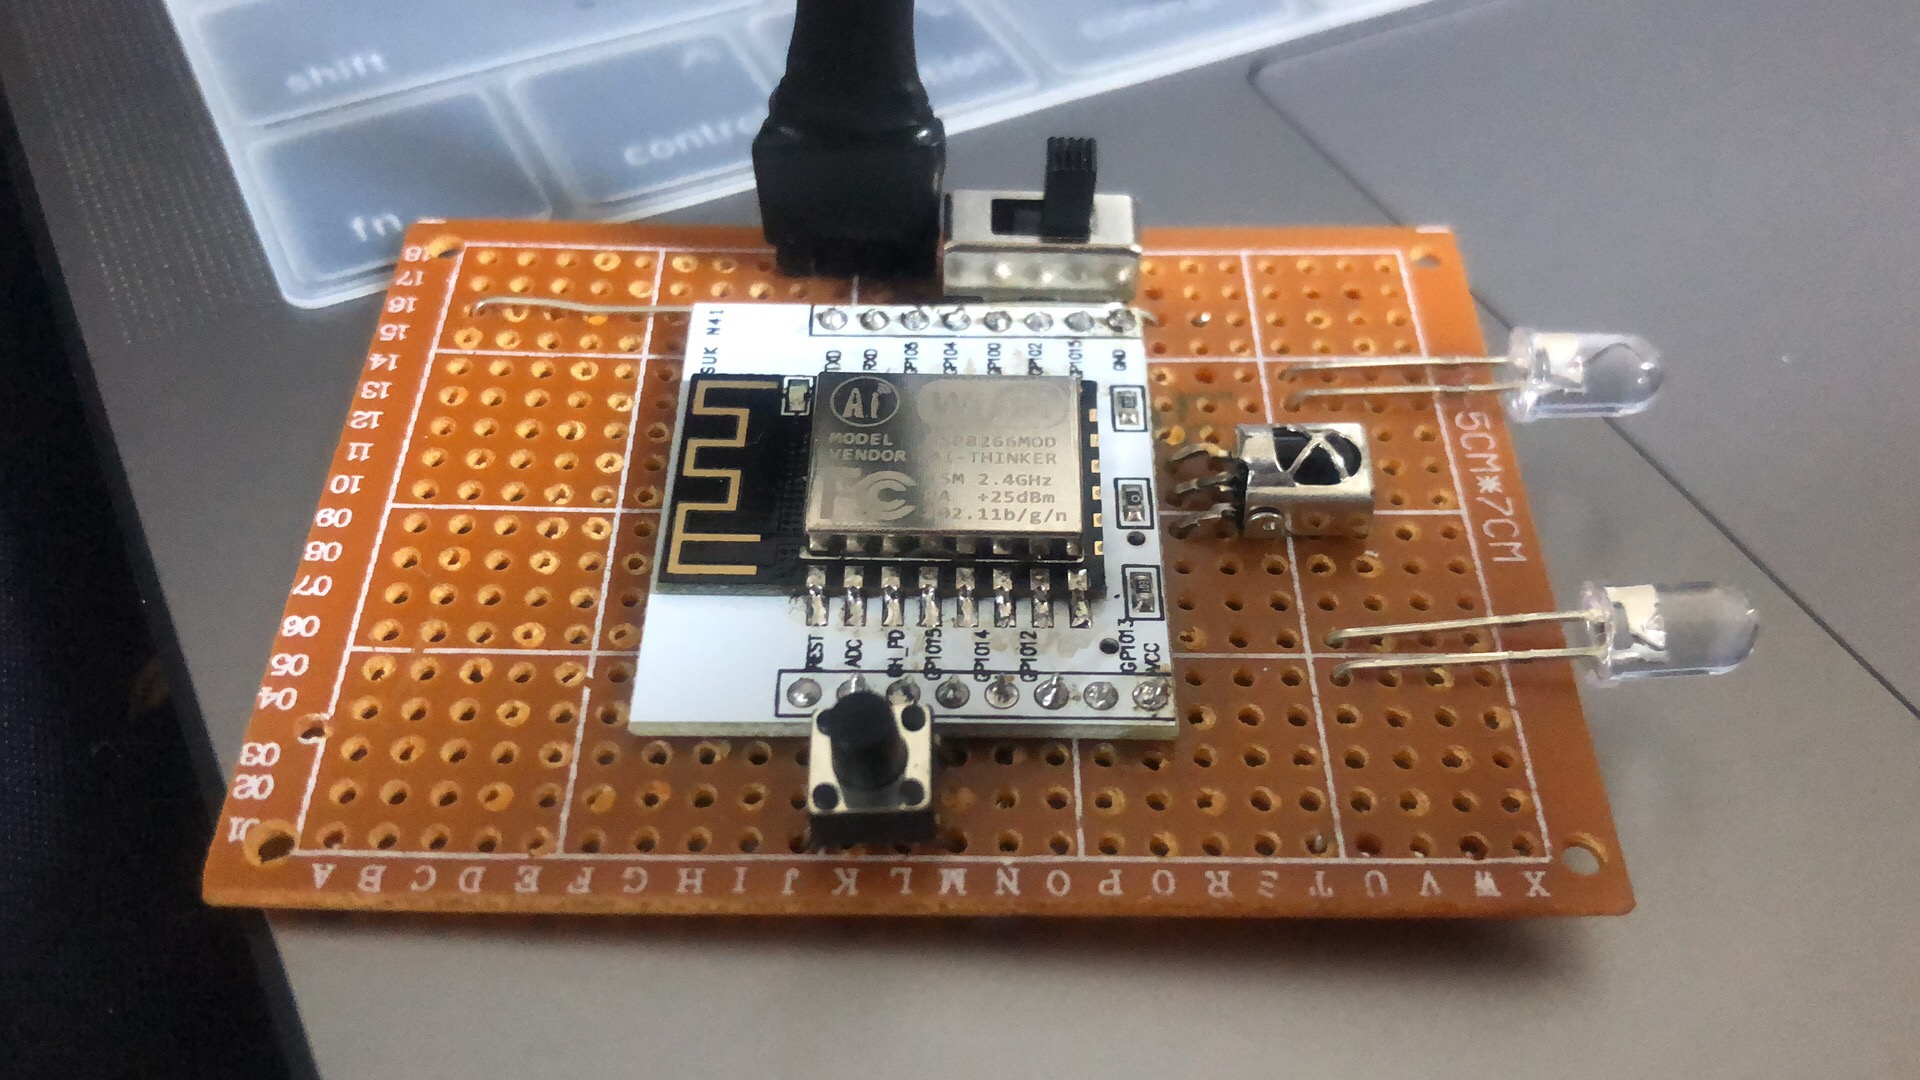

通过3.3v的ttl线,和电脑连接。
软件部分
我们在工具 -> 管理库中搜索IRremoteESP8266安装。
在more info里面打开github页面,可以找到示例代码
我们找到这个红外发射代码放如IDE中,这里写的推荐4脚,但是官方写的推荐14脚,不知道信谁的,我这里选择14脚。
#include <Arduino.h>
#include <IRremoteESP8266.h>
#include <IRsend.h>
#include <IRrecv.h>
#include <IRutils.h>

IRsend irsend(14);
IRrecv irrecv(4);
decode_results results;

void setup() {
  Serial.begin(115200,SERIAL_8N1,SERIAL_TX_ONLY);
  irsend.begin();
  irrecv.enableIRIn();  // Start the receiver
}

void dump(decode_results *results) {
  serialPrintUint64(results->value, 16);
  Serial.print("\n{ ");
  for (uint16_t i = 1; i < results->rawlen; i++) {
    if (i != 1)
      Serial.print(", ");
    Serial.print(results->rawbuf[i] * kRawTick, DEC);
  }
  Serial.println("};");
}

void loop() {
  if (irrecv.decode(&results)) {
    dump(&results);
    irrecv.resume();
  }
//  delay(1000);
//  irsend.sendNEC(0x41B6649B, 32);
//  delay(1000);
}


/* 付自家nec灯遥控编码 CH1 | CH2
 *  41B6659A  41B6649B  全灯
 *  41B63DC2  41B63CC3  夜灯
 *  41B67D82  41B67C83  关灯
 *  41B6DD22  41B6DC23  变暗
 *  41B65DA2  41B65CA3  变亮
 */
刷入发射红外可以看到解码仪上有显示
踩坑记录,红外收码没法使用,刚刚看到有人说GPIO15口不要用,我刚好收码放到15口。哎。。。
明天去学校改下电路。。。
电路改完回来了,把红外接收的VS1838B换到GPIO4口,果然能接收数据了。
我这里遥控器全灯编码是41B6649B其中前4位是用户码,5-6位是数据码,7-8位是数据码反码
5-6位数据码 加 7-8位数据码反码 要等于 FF
不过有个问题,就是esp8266接收的遥控器是用户吗是41B6
但是解码仪显示的是826D,我们分析一下两个数值的二进制找一下关系41B6 = 0100 0001 1011 0110826D = 1000 0010 0110 1101
可以明显发现是 每个字节 逆序了。也就是二进制每8位逆序。
我们逆逆得顺就能把41B6还原成826D了
后面数据码同理。
具体js计算方法如下,输入c('826d26')得到“41b6649b”,还能自动加上补码
cc = (a)=>parseInt(('00000000'+parseInt(a,16).toString(2)).slice(-32).replace(/.{8}/g,(a)=>a.split('').reverse().join('')),2).toString(16).replace(/.{2}$/,(a)=>a+('00'+(255-parseInt(a,16)).toString(16)).slice(-2))加上控制空调代码,以及能接收红外编码
#include <Arduino.h>
#include <IRremoteESP8266.h>
#include <IRsend.h>
#include <IRrecv.h>
#include <IRutils.h>

#include <ESP8266WiFi.h>
#include <WiFiClient.h>
#include <ESP8266WebServer.h>
#include <ESP8266mDNS.h>

const char *ssid = "ASUS";
const char *password = "Aa+121212";
ESP8266WebServer server(80);

IRsend irsend(14);
IRrecv irrecv(4, 1024, 50, true);
decode_results results;

void setup() {
  pinMode(2, OUTPUT);
  bool pin2 = false;

  Serial.begin(115200, SERIAL_8N1, SERIAL_TX_ONLY);
  irsend.begin();

  WiFi.mode(WIFI_STA);
  WiFi.begin(ssid, password);
  while (WiFi.status() != WL_CONNECTED) {
    delay(500);
    pin2 = !pin2;
    digitalWrite(2, pin2);
    Serial.print(".");
  }
  digitalWrite(2, 1);

  Serial.println("");
  Serial.print("Connected to ");
  Serial.println(ssid);
  Serial.print("IP address: ");
  Serial.println(WiFi.localIP());

  if (MDNS.begin("esp8266")) {
    Serial.println("MDNS responder started");
  }

  server.on("/send_nec", handle_SEND_NEC);
  server.on("/read_nec", handle_READ_NEC);
  server.on("/send_daikin", handle_SEND_DAIKIN);
  server.on("/read_daikin", handle_READ_DAIKIN);
  server.begin();
  Serial.println("HTTP server started");
}


bool handle_IR(unsigned int delayTime = 5000) {
  unsigned long startMillis = millis();
  irrecv.enableIRIn();
  while (!irrecv.decode(&results)) {
    if ((millis() - startMillis >= delayTime)) {
      irrecv.disableIRIn();
      return false;
    }
    delay(100);
  }
  irrecv.disableIRIn();
  return true;
}

void handle_READ_NEC() {
  digitalWrite(2, 0);
  if (!handle_IR()) {
    server.send(200, "text/plain", "no recv");
  } else {
    String code = uint64ToString(results.value, 16);
    server.send(200, "text/plain", code);
    Serial.println(code);
  }
  digitalWrite(2, 1);
  irrecv.resume();
}

void handle_READ_DAIKIN() {
  digitalWrite(2, 0);
  if (!handle_IR()) {
    server.send(200, "text/plain", "no recv");
  } else {
    String code = resultToHexidecimal(&results);
    server.send(200, "text/plain", code);
    Serial.println(code);
  }
  digitalWrite(2, 1);
  irrecv.resume();
}

void handle_SEND_NEC() {
  digitalWrite(2, 0);
  uint32_t code = strtoul(server.argName(0).c_str(), NULL, 16);
  irsend.sendNEC(code);
  server.send(200, "text/plain", "ok");
  digitalWrite(2, 1);
}

void handle_SEND_DAIKIN() {
  digitalWrite(2, 0);
  String code_str = server.argName(0);
  uint8_t code_byte = code_str.length() / 2;
  uint8_t code_array[kStateSizeMax] = {0};
  for (int i = 0; i < code_byte; i++) {
    code_array[i] = strtoul(code_str.substring(2 * i, 2 * i + 2).c_str(), NULL, 16);
  }
  irsend.send(decode_type_t::DAIKIN, code_array, code_byte);
  server.send(200, "text/plain", "ok");
  digitalWrite(2, 1);
}

void loop(void) {
  server.handleClient();
  MDNS.update();
}
HomeKit
先安装 homebridge
我们在使用git://github.com/nfarina/homebridge.git这个库
因为已经上传到npmjs中所以,npm -g i homebridge就可以安装了
使用homebridge运行过一次后会生成~/.homebridge文件夹
我们修改其中的config.json文件
{
  "bridge": {
    "name": "家庭主控",
    "username": "CC:22:3D:E3:CE:30",
    "port": 51826,
    "pin": "031-45-154"
  },

  "description": "This is an example configuration file with one fake accessory and one fake platform. You can use this as a template for creating your own configuration file containing devices you actually own.",
  "ports": {
    "start": 52100,
    "end": 52150,
    "comment": "This section is used to control the range of ports that separate accessory (like camera or television) should be bind to."
  },
  "accessories": [
    {
      "accessory": "pch18-light", //主要是这里
      "name": "pch18-light" //主要是这里
    },
    {
      "accessory": "pch18-ac", //主要是这里
      "name": "pch18-ac" //主要是这里
    }
  ],

  "platforms": [

  ]
}添加两个设备,这两个设备也需要在全局的node_modules中定义,也就是和homebridge同文件夹
我们创建文件夹homebridge-pch18-light 这里必须以 homebridge开头
里面的package.json这么写,其中的keywords中必须写homebridge-plugin
{
  "name": "homebridge-pch18-light",
  "version": "1.0.0",
  "main": "index.js",
  "keywords": [
    "homebridge-plugin"
  ],
  "engines": {
    "homebridge": ">=0.2.0",
    "node": ">=0.12.0"
  }
}index.js这么写
const net = require('net');

module.exports = function (homebridge) {
  const Service = homebridge.hap.Service;
  const Characteristic = homebridge.hap.Characteristic;
  // registerAccessory' 的三个参数分别是 plugin-name, accessory-name, constructor-name

  homebridge.registerAccessory("pch18-light", "pch18-light", class {
    constructor(log, config) {
      this.name = '灯'
      this._level = 100
      this._powerOn = false
      this.log = log
      this.config = config
    }
    getServices() {
      const switchService = new Service.Lightbulb(this.name)

      switchService
        .getCharacteristic(Characteristic.On)
        .on('get', (cb) => {
          cb(null, this._powerOn)
          this.log('get On', this._powerOn)
        })
        .on('set', (powerOn, cb) => {
          cb()
          this.log('set On', powerOn)
          if (powerOn && !this._powerOn) {
            this.light_on(parseInt(this._level) || 100)
          } else if (!powerOn && this._powerOn) {
            this.light_off()
          }
        })

      switchService
        .getCharacteristic(Characteristic.Brightness)
        .on('get', (cb) => {
          cb(null, this._level);
          this.log('get Brightness', this._level)
        })
        .on('set', (value, cb) => {
          cb()
          this.log('set Brightness', parseInt(value))
          this.light_on(parseInt(value))
        })

      return [switchService];
    }
    light_on(level) {
      if (level > 0) {
        if (level >= 60 && (this._powerOn == false || this._level < 10)) {
          this.sendLight(100)
        } else if (level >= 10 && (this._powerOn == false || this._level < 10)) {
          this.sendLight(10)
        } else {
          this.sendLight(level)
        }
        this._level = level
        this._powerOn = true;
      } else {
        this.light_off()
      }
    }
    light_off() {
      this._powerOn = false;
      this.sendLight(0)
    }

    sendLight(level) {
      let code = '';
      if (level >= 100) {
        code = '41b6649b'; //全灯(826d26) 826d30
      } else if (level >= 90) {
        code = '41b68c73'; //9  826d31
      } else if (level >= 80) {
        code = '41b64cb3'; //8  826d32
      } else if (level >= 70) {
        code = '41b6cc33'; //7  826d33
      } else if (level >= 60) {
        code = '41b62cd3'; //826d34
      } else if (level >= 50) {
        code = '41b6ac53'; //5  826d35
      } else if (level >= 40) {
        code = '41b66c93'; //4  826d36
      } else if (level >= 30) {
        code = '41b6ec13'; //3  826d37
      } else if (level >= 20) {
        code = '41b61ce3'; //2  826d38
      } else if (level >= 10) {
        code = '41b644bb'; //1低亮(826d22)  826d39
      } else if (level > 0) {
        code = '41B63CC3'; //夜灯
      } else if (level <= 0) {
        code = '41B67C83'; //关灯
      }
      // let nocb = true;
      this.log('send ir ' + code)
      var client = net.connect({ host: '192.168.2.144', port: 80 }, () => {
        client.write(`GET /send_nec?${code} HTTP/1.1\r\n\r\n`);
        setTimeout(() => {
          client.destroy();
        }, 100)
      });
    }
  });
}同样我们创建homebridge-pch18-ac文件夹package.json
{
  "name": "homebridge-pch18-ac",
  "version": "1.0.0",
  "main": "index.js",
  "keywords": [
    "homebridge-plugin"
  ],
  "engines": {
    "homebridge": ">=0.2.0",
    "node": ">=0.12.0"
  }
}
index.js
const net = require('net');

module.exports = function (homebridge) {
        const Service = homebridge.hap.Service;
        const Characteristic = homebridge.hap.Characteristic;
        // registerAccessory' 的三个参数分别是 plugin-name, accessory-name, constructor-name

        homebridge.registerAccessory("pch18-ac", "pch18-ac", class {
                constructor(log, config) {
                        this.name = '空调'
                        this.log = log
                        this.config = config
                        this._s = {
                                active: 0,
                                temperature: 30,
                        }
                }
                getServices() {
                        let heaterCoolerService = new Service.HeaterCooler(this.name);
                        //开关
                        heaterCoolerService
                                .getCharacteristic(Characteristic.Active)
                                .on('get', (cb) => {
                                        cb(null, this._s.active)
                                })
                                .on('set', (active, cb) => {
                                        cb()
                                        this._s.active = active
                                        this.send()
                                })

                        //显示当前温度
                        heaterCoolerService
                                .getCharacteristic(Characteristic.CurrentTemperature)
                                .setProps({
                                        minValue: 0,
                                        maxValue: 100,
                                        minStep: 0.01
                                })
                                .on('get', (cb) => {
                                        cb(null, this._s.temperature)
                                });

                        //设置制冷温度
                        heaterCoolerService
                                .getCharacteristic(Characteristic.CoolingThresholdTemperature)
                                .setProps({
                                        minValue: 24,
                                        maxValue: 32,
                                        minStep: 1
                                })
                                .on('get', (cb) => {
                                        cb(null, this._s.temperature)
                                })
                                .on('set', (temperature, cb) => {
                                        cb()
                                        this._s.temperature = temperature
                                        this.send()
                                })

                        // 风速
                        // heaterCoolerService
                        //   .getCharacteristic(Characteristic.RotationSpeed)
                        //   .setProps({
                        //     unit: null,
                        //     format: Characteristic.Formats.UINT8,
                        //     maxValue: 6,
                        //     minValue: 1,
                        //     validValues: [1, 2, 3, 4, 5, 6] // 6 - auto
                        //   })
                        //   .on('get', (cb) => {
                        //     cb(null, 0)
                        //   })
                        //   .on('set', (mode, cb) => {
                        //     cb()
                        //     this.log('log', mode)
                        //   });

                        //摆动
                        // heaterCoolerService
                        //   .getCharacteristic(Characteristic.SwingMode)
                        //   .on('get', (cb) => {
                        //     cb(null, 0)
                        //   })
                        //   .on('set', (mode, cb) => {
                        //     cb()
                        //     this.log('log', mode)
                        //   });


                        return [heaterCoolerService];
                }


                send() {
                        let code = '';
                        if (this._s.active) {
                                code = code_mapping.cooling[this._s.temperature]
                        } else {
                                code = code_mapping.off
                        }
                        var client = net.connect({ host: '192.168.2.144', port: 80 }, () => {
                                client.write(`GET /send_daikin?${code} HTTP/1.1\r\n\r\n`);
                                setTimeout(() => {
                                        client.destroy();
                                }, 100)
                        });
                }
        });
}


const code_mapping = {
        off: '11DA2700C500401711DA27004200005411DA270000383C00AF000000000000C00000F5',
        cooling: {
                24: '11DA2700C500401711DA27004200005411DA270000393000AF000000000000C00000EA',
                25: '11DA2700C500401711DA27004200005411DA270000393200AF000000000000C00000EC',
                26: '11DA2700C500401711DA27004200005411DA270000393400AF000000000000C00000EE',
                27: '11DA2700C500401711DA27004200005411DA270000393600AF000000000000C00000F0',
                28: '11DA2700C500401711DA27004200005411DA270000393800AF000000000000C00000F2',
                29: '11DA2700C500401711DA27004200005411DA270000393A00AF000000000000C00000F4',
                30: '11DA2700C500401711DA27004200005411DA270000393C00AF000000000000C00000F6',
                31: '11DA2700C500401711DA27004200005411DA270000393E00AF000000000000C00000F8',
                32: '11DA2700C500401711DA27004200005411DA270000394000AF000000000000C00000FA',
        }

}
其中空调编码是访问esp8266的/read_daikin抓包得到的
参考:
 pch18
pch18 

666
555